Stacking frames with podi_swarpstack
The final step of data processing after the actual reduction is to combine all frames in a dither sequence into one frame, thus eliminating all the small and large gaps between cells and OTAs. This can be done in a number of ways, and using the podi_swarpstack routine is one of them.
Basic functionality
in the most basic form, you can stack your data be executing
podi_swarpstack.py output.fits /some/dir/all_files*.fits
You will then see some output looking like this:
Yippie, found 8 CPUs to use in parallel!
File may have been truncated: actual file length (5760) is smaller than the expected size (351233280)
Stack information...
 Output-dimensions: 9375 x 9366
SwarpStack - Singles: Preparing file /nas/wiyn/jenna/sci2/20130216T203749.3___ngc_2403__120.0__odi_i.fits, please wait ...
SwarpStack - Singles: Preparing file /nas/wiyn/jenna/sci2/20130216T203749.4___ngc_2403__120.0__odi_i.fits, please wait ...
SwarpStack - Singles: Preparing file /nas/wiyn/jenna/sci2/20130216T203749.5___ngc_2403__120.0__odi_i.fits, please wait ...
SwarpStack - Singles: Preparing file /nas/wiyn/jenna/sci2/20130216T203749.6___ngc_2403__120.0__odi_i.fits, please wait ...
SwarpStack - FinalStack: Starting final stacking...
SwarpStack - FinalStack: done, swarp returned (ret-code: 0)!
Don’t worry about the warning “File may have been truncated”. To avoid repeated image interpolation, in a first step swarp is instructed to only produce the header of the final stacked frame, i.e. a FITS file with no image data. The information from this file is then used when distortion-correcting the individual files. However, since there’s no image data the files appears truncated.
Use a configuration file for each stack
Shortly after we started using the script internally we thought it might be a good idea if we could put all configuration parameters into a configuration file. This way we can keep track of what parameters and files we used. This is now supported, and instead of listing files and parameters on the command-line, you can put them into a text-file, one line per parameter and/or filename, and run swarpstack with the -fromfile=config.conf option:
2010df1_stack5.fits
-pixelscale=0.2
-bgsub
./20140209T215412.2.fits
./20140209T215412.3.fits
./20140209T215412.4.fits
./20140209T221515.1.fits
The first filename given is the output filename (it does not matter if you put the output file or the command line options first). All other files are considered input files you want to stack. The remaining options specify the stacking parameters – in the example above this means in the order given:
1) adjust the pixelscale to 0.2”
2) perform background subtraction
The last four lines specify the four input files.
Available options:
– changing the pixel scale
In many cases it is not required to keep the full ODI resolution, either because of poor seeing or because you are using a Mac and have problems opening the multi-gigabyte files. In these cases, you can increase the pixel-size, hence covering the same sky-area with fewer pixels and a smaller FITS file. To do so, simply add the -pixelscale keyword and specify the pixelscale in arcseconds per pixel, For example, to produce an output stack with 0.2 arcsec pixels, run
podi_swarpstack.py output_largerpixels.fits -pixelscale=0.2 /my/files/*.fits
Note: If you choose this option, your count-rates per pixel will increase with increasing pixel-scale to conserve fluxes. So don’t be surprised if your stars suddenly have 200,000 counts, although the (unbinned) saturation level is only 65,000 counts.
– background subtraction
In many cases some background subtraction is essential, such as when the global background-levels are changing from one exposure to the next, leaving some remnants of the chip-gaps visible in the stack. Fortunately, swarp also supports a on-the-fly background subtraction. To activate this functionality, add -bgsub to your command:
podi_swarpstack.py output_galaxygone.fits -bgsub /my/files/*.fits
– optimizing the background subtraction for extended objects
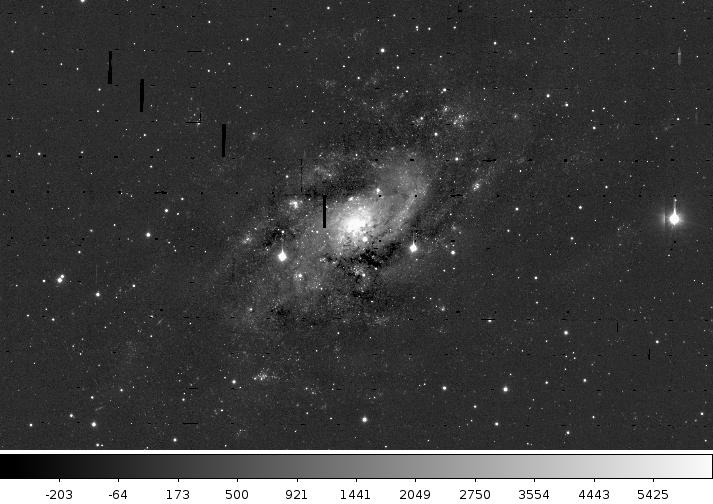
The biggest down-side of the background subtraction is that it can also subtract real signal from the stacked frame. This is particularly bad if you are dealing with extended objects such as nearby galaxies. One example is the following stack of NGC2403, for which the background subtraction was enabled but left at the default values:
podi_swarpstack.py output_better.fits -bgsub -dimension=8 /my/files/*.fits
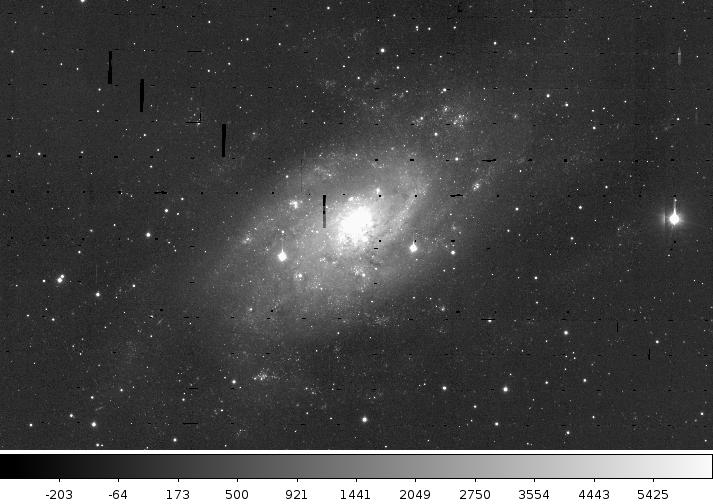
To avoid this problem, you can specify the spatial extent of the largest science target, and then podi_swarpstack tries to adjust the background fitting parameters to avoid over-subtracting structures of the specified size and smaller. For the above example, the galaxy is roughly 8 arcmins across, so adding the -dimension keyword to the command line yields a much better result:
podi_swarpstack.py output_better.fits -bgsub -dimension=8 /my/files/*.fits
The results with this option look much better, no more (or at least very much less) over-subtraction between spiral arms
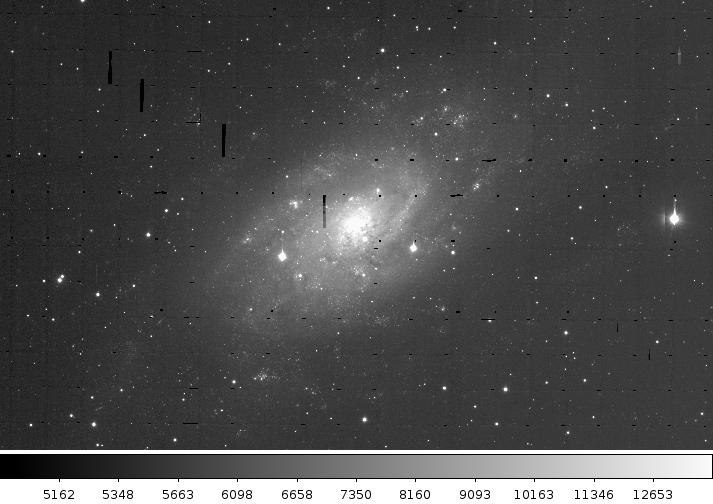
For comparison, here is the frame of the same galaxy without the background subtraction:
– omitting some OTAs from the stack
In many cases you might be interested in just a small part of the frame and don’t want to create the entire stack. In this case you can specify which OTAs you want to omit via the -skipota=A,B,C option:
~/bin/podi/podi_swarpstack.py output.fits -skipota=00,16,61,55 input1.fits input2.fits
In this example, you would omit all OTAs besides the central 3×3 area. To only stack a single OTA, just keep added OTAs to omit:
~/bin/podi/podi_swarpstack.py output.fits -skipota=00,16,61,55,22,23,24,32,34,42,43,44 input1.fits input2.fits
This command would exclude all OTAs except the very central one.
Advanced modes
1. Adding frames to an already existing stack
In come cases, in particular when sitting at the telescope, you may want to add an additional frame to an already existing stack to save the time it takes to re-create the stack from scratch. podi_swarpstack supports this mode by simply adding the -add keyword:
podi_swarpstack.py output_alittledeeper.fits -add /my/files/*.fits
2. Producing a stack matched to another stack
description coming soon
3. Stacking exposures of moving objects
If you dealing with moving objects such as asteroids or comets, the straightforward stacking will do no good, as your moving object will produce multiple images or trails. In these cases, you can specify the -nonsidereal keyword that corrects the WCS solution to account for the extra motion. Each frame is first corrected for this motion and then all frames are stacked as usual, hence you can combine this mode with any or all of the other options:
podi_swarpstack.py output_movingtarget.fits -add -nonsidereal=a,b,c /my/files/*.fits
In this case, a stands for the proper motion in Ra, b for the proper motion in Dec, and c represents a MJD reference. The latter can be either a number, or the filename of another FITS file that contains the “MJD-OBS” header keyword.
Note that this mode does exactly what the identical option in podi_collectcells does, so if you already specified the -nonsidereal when you ran collectcells, you don’t need to repeat it here. In fact, giving the option twice (in collectcells and swarpstack) over-corrects the data.
4. Choosing the image combination mode
You can select if you want to average or median-combine frames using a simple command line flag:
-combine=XXX
XXX can be any one of the following:
- average
- median
- sum
If you want two or more of these output options, you can specify a comma-separated list, such as
-combine=average,median